Inserting/Removing Cards
This camera accepts two cards. Recording is possible as long as there is at least one card in the camera.
With two cards inserted, you can select one card to record to, or you can record the same image to both cards at once ().
Caution
- Make sure the SD card's write-protect switch (1) is set upward to enable writing and erasing.
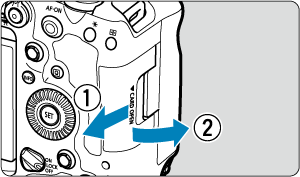
Insertion
-
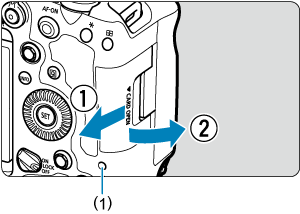
Slide the cover to open it.
-
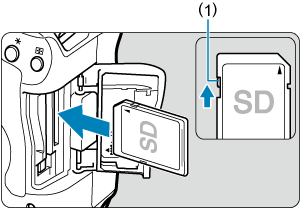
Insert the card.
Card 1 (CFexpress card)
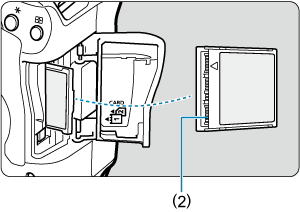
Card 2 (SD card)
- The card in the rear card slot is [
 ] (CFexpress card), and the one in front of it is [
 ] (SD card).
 - CFexpress card: With the card label facing you, insert the open side of the card (2) into the card slot. Inserting cards the wrong way may damage the camera.
- The card 1 eject button (gray) pops out.
- SD card: With the card label facing you, insert the card into the card slot until it clicks into place.
- The card in the rear card slot is [
-
Close the cover.
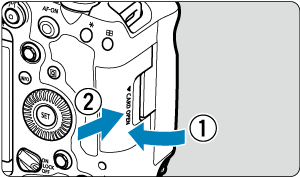
- Close the cover and slide it in the direction shown by the arrows until it snaps shut.
-
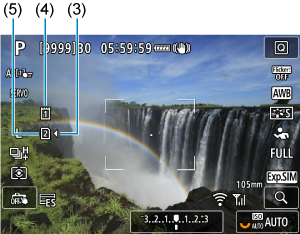
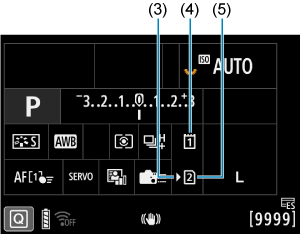
(3) Card selection icon
(4) Card 1 (CFexpress card)
(5) Card 2 (SD card)
Formatting the Card
If the card is new or was previously formatted (initialized) by another camera or computer, format the card with this camera ().
Removal
-
Open the cover.
- Set the power switch to
 .
. - Check that the access lamp (1) is off, then open the cover.
- If [Saving...] is displayed on the screen, close the cover.
- Set the power switch to
-
Remove the card.
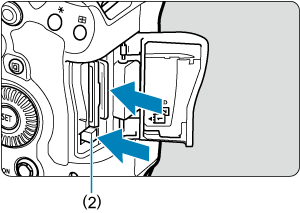
- CFexpress card: Press the card 1 eject button (2) to eject the card.
- SD card: Gently press the card in, then release it to eject it.
- Pull the card straight out, then close the cover.
Caution
Do not remove cards immediately after a red [![]() ] icon is displayed as you are shooting. Cards may be hot, due to high internal camera temperature. Set the power switch to
] icon is displayed as you are shooting. Cards may be hot, due to high internal camera temperature. Set the power switch to ![]() and stop shooting for a while before removing cards. Removing hot cards immediately after shooting may cause you to drop and damage them. Be careful when removing cards.
and stop shooting for a while before removing cards. Removing hot cards immediately after shooting may cause you to drop and damage them. Be careful when removing cards.
Note
Caution
-
When the access lamp is lit or blinking, it indicates that images are being written to, read from, or erased from the card, or data is being transferred. Do not open the card slot cover during this time. To avoid corrupting image data or damaging cards or the camera, never do any of the following while the access lamp is lit or blinking.
- Removing the card.
- Removing the battery.
- Shaking or striking the camera.
-
Unplugging or plugging in a power cord
(when using optional household power outlet accessories).
- If the card already contains recorded images, the image number may not start from 0001 ().
-
If a card-related error message is displayed on the screen, remove and reinsert the card. If the error persists, use a different card.
If you can transfer images on the card to a computer, transfer all the images and then format the card with the camera (). The card may then return to normal.
- Do not touch the card's contacts with your fingers or metal objects. Do not expose the contacts to dust or water. If smudges adhere to the contacts, contact failure may result.
- Multimedia cards (MMC) cannot be used. (Card error will be displayed.)
-
Use of UHS-II microSDHC/SDXC cards with a microSD to SD adapter is not recommended.
When using UHS-II cards, use SDHC/SDXC cards.