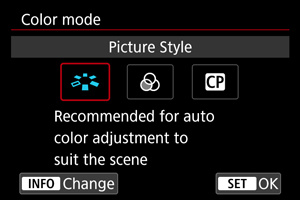
Color Mode
You can set your preferred movie or still photo image characteristics from the Picture Style, Color Filter, or Custom Picture menu.
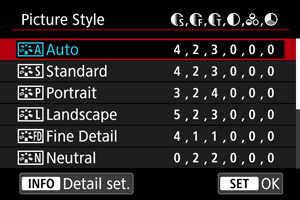
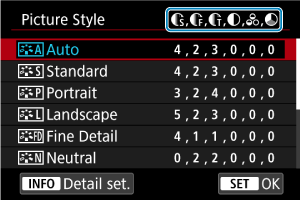
Picture Style
By selecting a preset Picture Style, you can obtain effective image characteristics.
Picture Style Characteristics
-
 Auto
AutoThe color tone will be adjusted automatically to suit the scene. The colors will look vivid for blue skies, greenery and sunsets, particularly in nature, outdoor, and sunset scenes.
Note
- If the desired color tone is not obtained with [Auto], use another Picture Style.
-
 Standard
The image looks vivid, sharp, and crisp. Suitable for most scenes.
-
 Portrait
For smooth skin tones, with slightly less sharpness. Suited for close-up portraits.
Skin tone can be adjusted by changing [Color tone] as described in Settings and Effects.
-
 Landscape
For vivid blues and greens, and very sharp and crisp images. Effective for impressive landscapes.
-
 Fine Detail
For detailed rendering of fine subject contours and subtle textures. The colors will be slightly vivid.
-
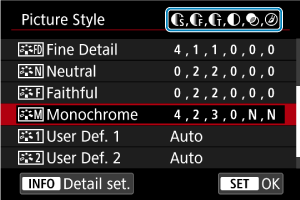
 Neutral
For retouching later on a computer. Makes images subdued, with lower contrast and natural color tones.
-
 Faithful
For retouching later on a computer. Faithfully reproduces the actual colors of subjects as measured in daylight with a color temperature of 5200K. Makes images subdued, with lower contrast.
-
 Monochrome
Creates black-and-white images.
Caution
- Color images cannot be recovered from JPEG/HEIF images shot with the [Monochrome] Picture Style.
-
 User Def. 1–3
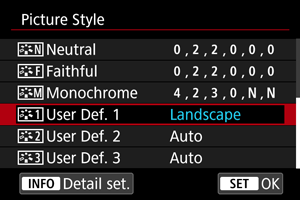
You can add a new style based on presets such as [Portrait] or [Landscape] or a Picture Style file, then adjust it as needed (). Shots taken with a style you have not customized yet will have the same characteristics as the default [Auto] setting.
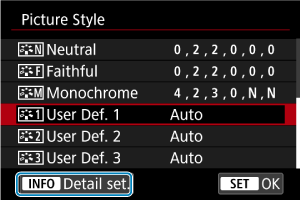
Symbols
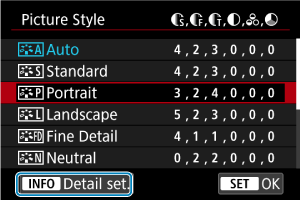
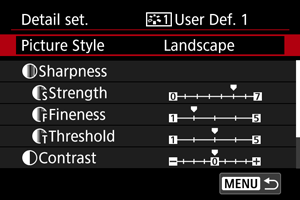
Icons on the Picture Style selection screen represent [Strength], [Fineness], and [Threshold] for [Sharpness] as well as [Contrast] and other parameters. The numbers indicate the values for these settings specified for the respective Picture Style.
| Sharpness | ||
| Strength | ||
| Fineness | ||
| Threshold | ||
| Contrast | ||
| Saturation | ||
| Color tone | ||
| Filter effect (Monochrome) | ||
| Toning effect (Monochrome) | ||
Caution
- For movie recording, “*, *” is indicated for the [Fineness] and [Threshold] parameters of [Sharpness]. [Fineness] and [Threshold] cannot be set for movie recording.
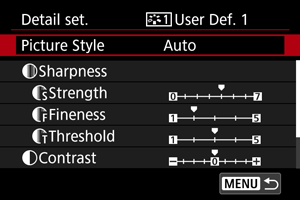
Picture Style Customization
You can customize any Picture Style by changing it from the default settings. For details on customizing [Monochrome], see ![]() Monochrome Adjustment.
Monochrome Adjustment.
-
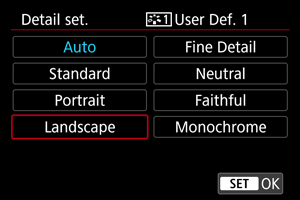
Select [Picture Style].
- Select a Picture Style, then press the INFO button.
-
Select a Picture Style.
- Select the Picture Style to adjust, then press the INFO button.
-
Select an option.
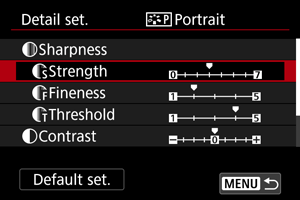
- Select an option, then press
 .
. - For details on settings and effects, see Settings and Effects.
- Select an option, then press
-
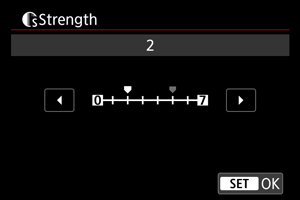
Set the effect level.
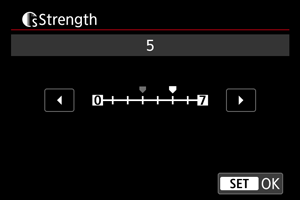
- Adjust the effect level, then press .
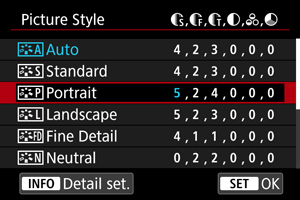
- Press the
 button to save the adjusted setting and return to the Picture Style selection screen.
 - Any settings you change from default values are displayed in blue.
- Adjust the effect level, then press
Note
- For movie recording, [Fineness] and [Threshold] for [Sharpness] cannot be set (not displayed).
- By selecting [Default set.] in step 3, you can restore the parameter settings of the respective Picture Style to the defaults.
- To shoot with the Picture Style you adjusted, first select the adjusted Picture Style, then shoot.
Settings and Effects
| Sharpness | ||||
| Strength | 0: Weak outline emphasis | 7: Strong outline emphasis | ||
| Fineness*1 | 1: Fine | 5: Grainy | ||
| Threshold*2 | 1: Low | 5: High | ||
| Contrast | –4: Low contrast | +4: High contrast | ||
| Saturation | –4: Low saturation | +4: High saturation | ||
| Color tone | –4: Reddish skin tone | +4: Yellowish skin tone | ||
1: Indicates the edge thinness that enhancement applies to. The smaller the number, the finer the outlines that can be emphasized.
2: Contrast threshold between edges and surrounding image areas, which determines edge enhancement. The smaller the number, the more the outline will be emphasized when the contrast difference is low. However, noise tends to be more noticeable when the number is smaller.
Monochrome Adjustment
 Filter effect
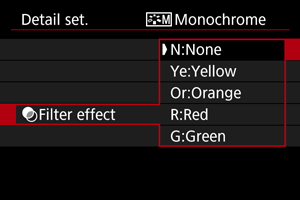
With a filter effect applied to a monochrome image, you can make white clouds or green trees stand out more.
| Filter | Sample Effects |
|---|---|
| N:None | Normal black-and-white image with no filter effects. |
| Ye:Yellow | Blue sky will look more natural, and white clouds will look crisper. |
| Or:Orange | The blue sky will look slightly darker. The sunset will look more brilliant. |
| R:Red | The blue sky will look quite dark. Fall leaves will look crisper and brighter. |
| G:Green | Skin tones and lips will appear muted. Green tree leaves will look crisper and brighter. |
Note
- Increasing [Contrast] will make the filter effect more pronounced.
 Toning effect
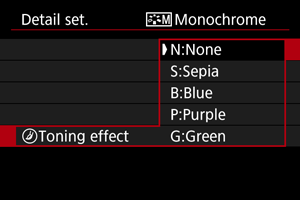
By applying a toning effect, you can create a monochrome image in the selected color. Effective when you want to create memorable images.
Picture Style Registration
You can select a base Picture Style such as [Portrait] or [Landscape], adjust it as desired, and register it under [User Def. 1] – [User Def. 3]. Useful when creating several Picture Styles with different settings.
-
Select [Picture Style].
- Select a Picture Style, then press the INFO button.
-
Select [User Def. *].
- Select [User Def. *], then press the INFO button.
-
Press
.
- With [Picture Style] selected, press .
- With [Picture Style] selected, press
-
Select a base Picture Style.
- Select the base Picture Style, then press .
- Select the base Picture Style, then press
-
Select an option.
- Select an option, then press .
- Select an option, then press
-
Set the effect level.
- Adjust the effect level, then press .
- For details, see Picture Style Customization.
- Press the button to save the adjusted setting and return to the Picture Style selection screen.
- The base Picture Style will be indicated on the right of [User Def. *].
- Blue style names in [User Def. *] have been changed from default values.
- Adjust the effect level, then press
Caution
- If a Picture Style is already registered under [User Def. *], changing the base Picture Style will clear the parameter settings of the previously registered User Defined Picture Style.
- You can restore the default [User Def. *] style and settings by selecting [Basic settings] in [
 : Reset camera].
Note
- To shoot with a registered Picture Style, select the registered [User Def. *], then shoot.
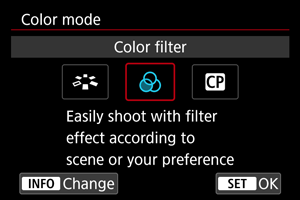
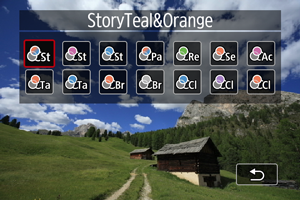
Color Filter
You can add effects to images by selecting preset filters.
| Filter | Effect | Recommended Scenes |
|---|---|---|
| Matte with teal shadows and amber highlights | High-contrast daytime scenes and other scenes with contrast, such as well-lit rooms | |
| Matte with a magenta filter effect overall | ||
| Matte with a blue filter effect overall | ||
| Teal shadows and amber highlights | Scenes with contrast that include some amber or yellowish colors | |
| Faded with a green filter effect overall | Old buildings, cityscapes | |
| Faded with a sepia filter effect overall | ||
| All colors except reds are faded | Scenes that include some reddish colors | |
| High saturation and bright midtones, with warm colors overall | Scenes that include food or beverages in warm tones | |
| High saturation and bright midtones, with cool colors overall | Scenes that include food or beverages in cool tones | |
| Low contrast, light shadows while keeping the ambiance dark, and warm colors | Dimly lit scenes with warm-toned light sources | |
| Low contrast, light shadows while keeping the ambiance dark, and cool colors | ||
| Low contrast, bright shadows, with light blue overall | Bright evening cityscapes, indoor scenes | |
| Low contrast, bright shadows, with light purple overall | ||
| Low contrast, bright shadows, with light amber overall |
Caution
- Color filters may prevent images from being rendered with smooth gradation and may result in image noise.
- Some camera settings or subjects may prevent you from obtaining your expected colors.
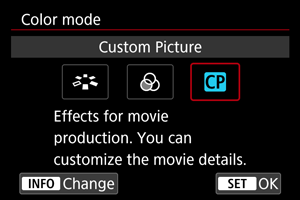
Custom Picture
Custom picture files on the camera enable you to adjust color tones in movie recording by applying a combination of settings (gamma/color space, color matrix, and look files), mainly in preparation for post-production processing.
- You can select a custom picture file to record movies with your preferred image characteristics.
- Preset custom picture files can be edited to create new ones.
- To adjust movie color tones, you can register look files.
Caution
- Applying custom pictures may change the metering level.
Selecting custom picture files
-
Select [Custom Picture].
- Select [Custom Picture], then press the INFO button.
-
Select [Select
 File].
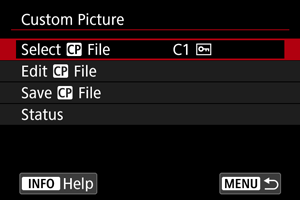
-
Select a custom picture file.
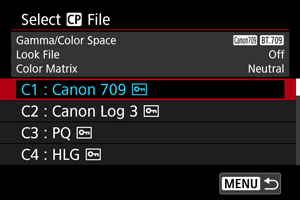
Custom Picture File Gamma/Color Space Look File Color Matrix Summary C1: Canon 709 Canon 709 / BT.709 Off Neutral Wider dynamic range than BT.709 Standard
Suitable for display on BT.709 compliant-monitors
Also suitable without post-processing
C2: Canon Log 3 Canon Log 3 / C.Gamut Off Neutral Uses Canon Log 3 gamma; post-processing required
Retains Canon Log characteristics while expanding the dynamic range
C3: PQ PQ / BT.2020 Off Neutral Uses an HDR gamma curve compliant with the ITU-R BT.2100 (PQ) standard (in 8-bit recording, equivalent to the ITU-R BT.2100 (PQ) standard) C4: HLG HLG / BT.2020 Off Neutral Uses an HDR gamma curve compliant with the ITU-R BT.2100 (HLG) standard (in 8-bit recording, equivalent to the ITU-R BT.2100 (HLG) standard) C5: BT.709 Standard BT.709 Standard / BT.709 Off Video Suitable for display on BT.709 compliant-monitors
Uses a gamma curve compliant with the ITU-R BT.709 standard
C6 to C20 (User06 to User20) Canon 709 / BT.709 Off Neutral Wider dynamic range than BT.709 Standard
Suitable for display on BT.709 compliant-monitors
Also suitable without post-processing
Editing custom pictures
You can edit settings of the selected custom picture file.
-
Select [Custom Picture].
- Select [Custom Picture], then press the INFO button.
-
Select [Edit
File].
- To edit a protected ([
 ]) custom picture file, select [Unprotect] by [Protect] to enable editing.

- To edit a protected ([
-
Edit the settings as needed.
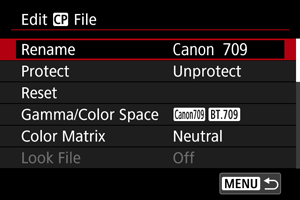
- Select a setting to edit, then adjust it on the screen displayed ().
- To save an edited custom picture file with a new name, select [Rename] and enter a name.
- To reset editing, select [Reset], then select the custom picture file to reset.
- For instructions on look files, see Using look files.
-
Protect the image.
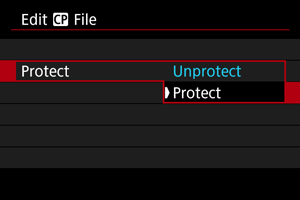
- When you are finished editing, select [Protect].
Custom picture setting items
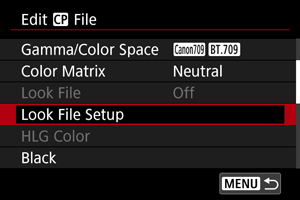
The following items can be set by using [Edit ![]() File].
File].
| Setting Item | Description | |
|---|---|---|
|
Gamma/Color Space Set the combination of gamma curve and color space |
||
| Gamma |
(1) Output (2) Input   |
|
| Canon Log 3 |
Gamma that retains Canon Log characteristics but with expanded dynamic range Requires image processing in post-production |
|
| PQ | HDR gamma compliant with the ITU-R BT.2100 (PQ) standard (in 8-bit recording, equivalent to the ITU-R BT.2100 (PQ) standard) | |
| HLG | HDR gamma compliant with the ITU-R BT.2100 (HLG) standard (in 8-bit recording, equivalent to the ITU-R BT.2100 (HLG) standard) | |
| BT.709 Standard |
Gamma compliant with the ITU-R BT.709 standard Suitable for display on BT.709 compliant-monitors |
|
| Canon 709 |
Gamma with a wide dynamic range that is also suitable without post-processing Suitable for viewing on BT.709 compliant-monitors |
|
| Color space | C.Gamut |
Color space developed by Canon based on image sensor characteristics, covering a wider color gamut than that of BT.2020 Also recommended when converting to the ACES2065-1 color space |
| BT.2020 | Color space compliant with the ITU-R BT.2020 standard for UHDTV (4K/8K) | |
| BT.709 | Standard color space compliant with sRGB standards | |
|
Color Matrix Color reproduction setting |
||
| Neutral | Faithful color reproduction | |
| Production Camera | Cinematic color reproduction | |
| Video | Color reproduction with a contrast for broadcast TV | |
|
Look File Use of look files |
||
| On | Enables color adjustment based on look files | |
| Off | Disables color adjustment based on look files | |
|
Look File Setup Look file registration/removal |
||
| Register | Registers look files (.cube format) to custom pictures | |
| Delete | Removes look files registered to custom pictures | |
|
HLG Color Hybrid log-gamma (HLG) color setting Available when the [Gamma/Color Space] gamma is set to [HLG] and color space is [BT.2020] |
||
| BT.2100 | Color equivalent to ITU-R BT.2100 | |
| Vivid | Color equivalent to “traditional color” in ITU-R BT.2390 | |
|
Black Black level adjustment Not available with [Gamma/Color Space] set to [Canon Log 3] |
||
| Master Pedestal | –50 to +50 | Increases or decreases the black level. Higher values brighten dark image areas but decrease contrast. Negative values darken blacks. |
|
Master Black Red Master Black Green Master Black Blue |
–50 to +50 | Corrects red, green, or blue color cast in blacks |
|
Black Gamma Lower gamma curve correction, for dark image areas Raises or lowers the black part of the gamma curve in the following ranges Available with [Gamma/Color Space] set to [BT.709 Standard] |
||
|
(1) Output (2) Input (3) Point (4) Level (5) Range  |
||
| Level | –50 to +50 | Sets the height of the lower gamma curve |
| Range | –20 to +50 | Sets the adjustment range, relative to [Point] |
| Point | Sets the vertex position | |
|
Low Key Saturation Color saturation adjustment in dark image areas |
||
| Activate | On, Off | Adjustment is enabled when set to [On] |
| Level | –50 to +50 | Sets the amount of adjustment |
|
Knee Compression of bright image areas to prevent clipped highlights Available with [Gamma/Color Space] set to [BT.709 Standard] |
||
|
(1) Output (2) Input Slope 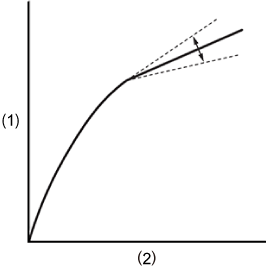
Point 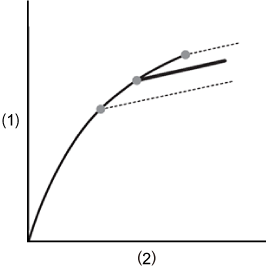
|
||
| Activate | On, Off | Adjustment with each setting is enabled when set to [On] |
| Slope | –35 to +50 | Adjusts the slope above the knee point |
| Point | 50 to 109 | Adjusts the knee point |
| Saturation | –10 to +10 | Adjusts color saturation in bright image areas |
|
Sharpness Sharpness adjustment |
||
| Level | –10 to +50 | Increases or decreases the level of edge sharpness |
| Detail Frequency | –8 to +8 |
Sets the center frequency for edge enhancement Higher values increase the frequency, sharpening images |
| Coring Level | –30 to +50 |
Sets the contrast threshold between edges and surrounding image areas, which determines edge enhancement Higher values prevent emphasizing subtle details, reducing noise |
| Limit | –50 to +50 | Restricts the amount of edge enhancement |
|
Noise Reduction Reduction of image noise |
||
| Automatic | On, Off | Automatically adjusted when set to [On] |
| Spatial Filter | Off, 1 to 12 |
Reduces noise by applying a soft focus-like effect to the entire image Although no artifacts are produced, the image as a whole is softened when set to an option other than [Off] |
| Frame Correlation | Off, 1 to 3 |
Reduces noise by comparing current and previous images (fields) when set to a value other than off Although apparent resolution is not affected, moving subjects may result in artifacts |
|
Skin Detail Skin-softening settings Controls skin tone detection and noise reduction Detected skin tone areas are displayed with a zebra pattern |
||
| Effect Level | Off, Low, Middle, High | Sets the level of the skin-softening filter, with [High] as the highest level |
| Hue | –16 to +16 | Sets the hue of skin tone to detect |
| Chroma | 0 to 31 | Sets the saturation of skin tone to detect |
| Area | Sets the color range of skin tone to detect | |
| Y Level | Sets the brightness of skin tone to detect | |
|
Color Matrix Tuning Fine-tuning of image color tones |
||
| Gain | –50 to +50 | Adjusts color intensity |
| Phase | –18 to +18 | Adjusts hue |
| R-G | –50 to +50 | Adjusts tint between cyan to green and between red to magenta |
| R-B | Adjusts tint between cyan to blue and between red to yellow | |
| G-R | Adjusts tint between magenta to red and between green to cyan | |
| G-B | Adjusts tint between magenta to blue and between green to yellow | |
| B-R | Adjusts tint between yellow to red and between blue to cyan | |
| B-G | Adjusts tint between yellow to green and between blue to magenta | |
|
Color Correction Settings to correct image areas with certain color characteristics Areas for correction are detected accordingly With the settings configured, areas not detected are displayed in neutral colors (except when adjusting [Area A Revision Level], [Area B Revision Level], [Area A Revision Phase], and [Area B Revision Phase]) |
||
| Select Area | Off, Area A, Area B, Area A&B |
Specifies areas (A or B) for color correction Area A is corrected when set to [Area A] Area B is corrected when set to [Area B] Both areas are corrected when set to [Area A&B] |
| Area A Setting Phase | 0 to 31 | Sets the color phase of Area A |
| Area A Setting Chroma | Sets the saturation of Area A | |
| Area A Setting Area | Sets the color range of Area A | |
| Area A Setting Y Level | Sets the brightness of Area A | |
| Area A Revision Level | –50 to +50 | Sets the amount of correction applied to saturation in Area A |
| Area A Revision Phase | –18 to +18 | Sets the amount of correction applied to the color phase of Area A |
| Area B Setting Phase | 0 to 31 | Sets the color phase of Area B |
| Area B Setting Chroma | Sets the saturation of Area B | |
| Area B Setting Area | Sets the color range of Area B | |
| Area B Setting Y Level | Sets the brightness of Area B | |
| Area B Revision Level | –50 to +50 | Sets the amount of correction applied to saturation in Area B |
| Area B Revision Phase | –18 to +18 | Sets the amount of correction applied to the color phase of Area B |
|
Other Functions [Over 100%] determines how the camera handles signals exceeding 100% Available with [Gamma/Color Space] set to [BT.709 Standard] |
||
| Over 100% | Through | Unmodified output |
| Press | Compresses signals that are up to 108% so that they are at 100% levels | |
| Clip | Discards portions of signals exceeding 100% | |
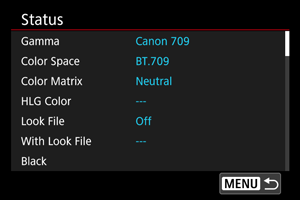
Checking custom picture settings
You can review custom picture file settings from the [Custom Picture] menu.

Saving and loading custom picture files
Edited custom picture files can be saved to a card and used with other cameras of the same model.
-
On the [Custom Picture] screen, select [Save
File].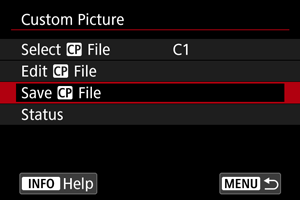
-
Select an option.

-
Save to card
Saves the edited custom picture file. Select a destination, then select [OK].
Up to 20 files can be saved. [New File] is displayed when you save the file, unless more than 20 files have already been saved. If 20 files have been saved, the files are overwritten with new files you save.
-
Load from card
Loads a custom picture file from a card. Select the file to load, then select [OK].
-
Using look files
You can register 17- or 33-grid 3D LUT files in .cube format from the Blackmagic Design application DaVinci Resolve as look files in custom picture files to adjust the color tone of movies you record.
Registering look files
Before you begin, the look file to register should be copied to a card.
-
Load the card in the camera.
-
Select [Edit
File].
- To edit a protected ([]) custom picture file, select [Unprotect] by [Protect] to enable editing.
- If you will edit a custom picture file and register a look file at the same time, do the look file registration last.
- To edit a protected ([
-
Select [Look File Setup].

-
Select [Register].
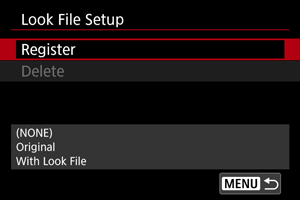
- Look files on the card are listed.
-
Select a look file.
-
After applying the look file, select the gamma/color space.
-
Select [OK].
Caution
-
The following look files are not compatible.
- Input range outside a range of 0–1 in the header (“LUT_3D_INPUT_RANGE”)
- 2 MB or larger, or with names exceeding 65 characters (including file extension)
-
With file names that include unsupported characters
Supported characters: 0–9, a–z, A–Z, underscore (_), hyphen (-), period (.), or single-byte space
- Data section includes values outside a range of 0–1
- Color tones will not be converted correctly unless a suitable gamma/color space is used for input and output.
- A registered look file cannot be used if you change [Gamma/Color Space], [HLG Color], or [Over 100%] settings after registration.
-
Signals above 100% or below 0% are not be used with [Gamma/Color Space] set to [BT.709 Standard]. Before registering look files for any signals above 100% that you will use, select [Press] in [Over 100%].
Using look files for color adjustment
You can use registered look files for color adjustment.
-
On the [Edit
File] screen, select [Look File]. -
Select [On].
- To disable color adjustment based on look files, select [Off].
Removing look files

Canon Log image quality
- With Canon Log, skies, white walls, and similar subjects may be affected by noise or uneven gradation, exposure, or colors, depending on the subject or shooting conditions. Banding or noise may also be noticeable in dark image areas.
- Noise may become more noticeable if you enhance the contrast or edit images in similar ways.
- Record a few test movies and check the results in advance.
- Image quality may improve if you change the ISO speed or, in post-production, perform color grading.
Caution
-
With Canon Log, autofocusing may be more difficult for subjects under low light, or for low-contrast subjects.
Difficulty in autofocusing can be reduced by shooting near maximum aperture or using a bright lens.
- Noise may appear at image edges if [Peripheral illum corr] in [
 : Lens aberration correction] is set to [Enable] when Canon Log is set.
 - Histograms with [:


 HDR/C.Log View Assist.] set to on are not based on conversion for View Assist display. Image areas shown in gray in the histogram roughly indicate signal values that are not used.