Setting Color Masking
Register a specific color area so that the front-back positional relationship of the real image and 3DCG is shown correctly. Configure the masking settings with the following procedure.
-
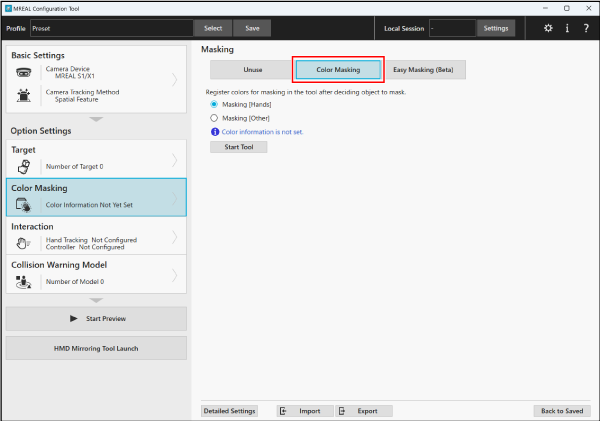
Select [Color Masking] in [Option Settings] of the MREAL Configuration Tool window.
-
Select [Color Masking] in the item detailed settings area on the right side.
-
-
Select the item to mask, and click [Start Tool].
- Select [Masking [Hands]] when masking a hand, and [Masking [Other]] when masking another object.
-
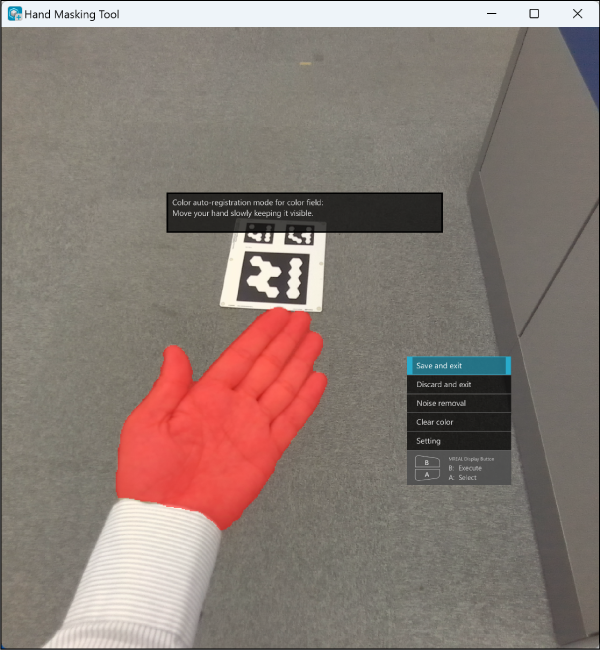
With [Masking [Hands]], the following Hand Masking Tool window appears.
-
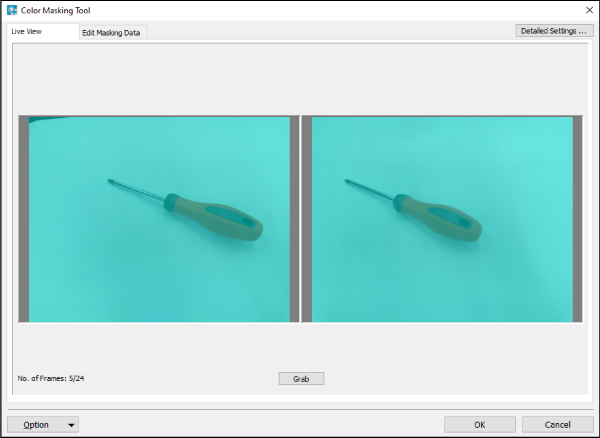
With [Masking [Other]], the following Color Masking Tool window appears.
Note
- The following setting procedure assumes that MREAL X1/S1 is being worn.
Masking [Hands]
With [Masking [Hands]], the color of the hand is distinguished automatically and then masking is performed.
-
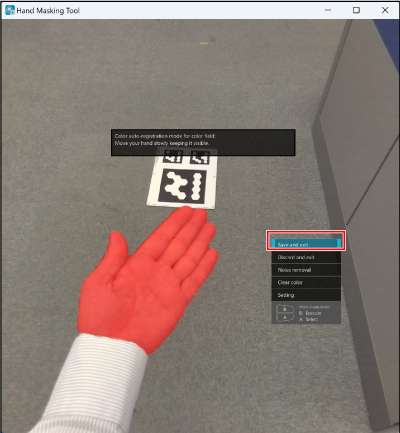
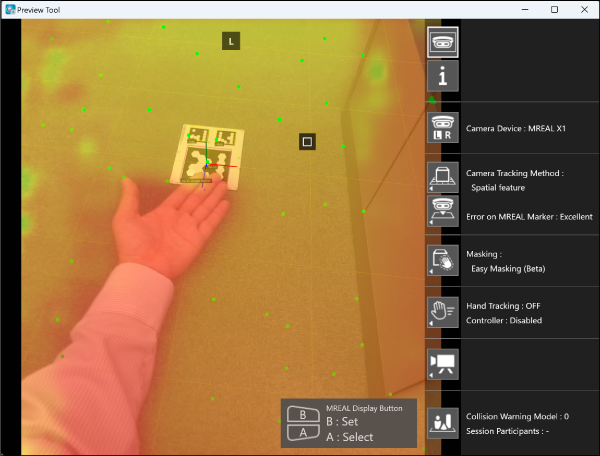
Move a hand within the Hand Masking Tool window.
- Move the hand slowly until red color (masking area) completely covers the area of the hand.
- Show both the palm and back of the hand in the image, ensuring both are covered by the red color.
-
Remove the noise.
- If an area other than the hand is masked, perform the noise removal operation.
- Select [Noise removal] from the menu.
-
The following registration frame is displayed within the window.
- Place the registration frame over the part where you want to erase the masking, and press button <B>.
- Repeat the above work until the area of the hand is covered by red color.
Note
- The Hand Masking Tool menu can be operated with the PC keyboard and mouse in addition to buttons <A> and <B> on the MREAL Display.
-
Save the masking information.
-
Press button <A> on the MREAL Display to select [Save and exit], and then press button <B>.
-
With the PC, perform the following operation.
- When in the MREAL Display display mode, press the [F11] key to switch to the window mode.
- Select [Save and exit] with the arrow keys, and press the [Enter] key.
- Click [Save and exit].
- Press the [Alt] and [F4] keys at the same time or click [×] on the window.
- Select [Yes] in the displayed window.
-
Masking [Other]
With [Masking [Other]], register a target you want to mask for each color.
-
Select the [Live View] tab in the Color Masking Tool window.
-
Capture the target you want to mask.
- Display the target you want to mask while viewing the MREAL Display.
-
Click [Grab] to capture an image.
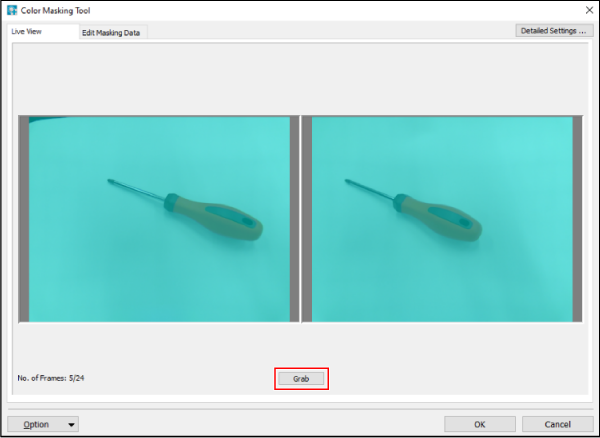
- Change the position and angle from which you view the target, and capture multiple images (up to 24).
-
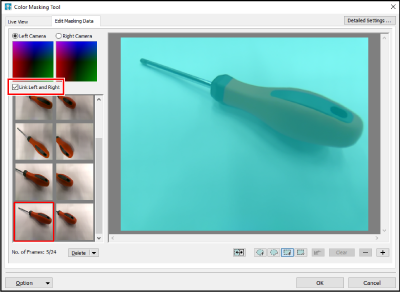
Select the [Edit Masking Data] tab.
-
Register the color to mask.
- If you select the image for which to perform masking from the thumbnail images on the left side, it is displayed in the area on the right side. If there is an unnecessary image, select the thumbnail image and click [Delete].
-
Use the tools in the Color Masking Tool window to register the colors while switching the captured images.

-
Select tool a or c, and select the range of the color to be the target.
- If a part other than the masking target is selected, select tool b or d and select the range of the color to exclude.
- The masking status can be confirmed on the [Live View] tab or in the Preview window or other window.
-
Use the other tools depending on the masking operation conditions.
e: Undoes the last operation.
f: Deletes the registered masking target color.
g/h: Reduces/enlarges the image.
-
Save the masking information.
- Click [OK] in the Color Masking Tool window.
- If you click [Cancel], Color Masking Tool ends without reflecting the settings in the profile.
Note
-
The following operation is recommended when you want to mask a target such as a person that contains various colors.
- Place the target you want to mask in front of a solid color background, and capture an image.
- Click [
 ].
]. -
Check that the entire target is masked, and click [OK].
- If you want to reduce the noise, click [Detailed Settings] at the top right of the Color Making Tool window and configure the noise reduction settings in the displayed window.
Easy Masking
If you select [Easy Masking] in the MREAL Configuration Tool window, you can perform easy masking.
Caution
- With the MREAL Display MD-10, there will be areas where masking cannot be applied at the edges of the screen.
Note
- We recommend checking the masking function using an application such as MREAL Visualizer.
- This function is a trial version, so the display in the depth direction is only an approximation.