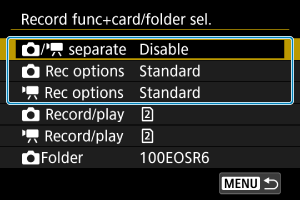
Selecting a Recording Method, Card/Folder
With two cards in the camera, you can set how the camera records to them and choose cards used for recording and playback. Folders for saving still photos can also be set.
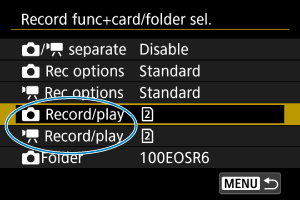
Recording/Card Selection with Two Cards Inserted
Recording is possible when card ![]() or
or ![]() is in the camera (except under some conditions). With only one card inserted, there is no need to follow these steps.
is in the camera (except under some conditions). With only one card inserted, there is no need to follow these steps.
With two cards inserted, you can select the recording method and card to use for recording and playback as follows.
Recording method with two cards inserted
![]() /
/![]() separate
separate
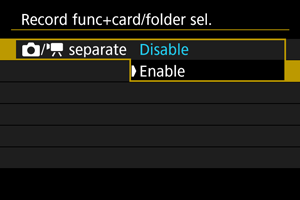
Select [Enable] for automatic configuration of the recording method for still photos and movies. Movies are recorded to card ![]() and still photos to card
and still photos to card ![]() .
.
Caution
- Specifying [Enable] will make [
 Rec options], [
 Rec options], [ Record/play], and [ Record/play] unavailable.
Note
- For playback, press the
 button for movie playback in movie recording mode or for still photo playback in still photo shooting mode.
![]() Rec options
Rec options
Set the recording method for still photos.
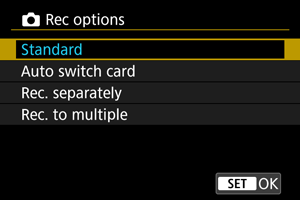
-
Standard
Records still photos to the card selected in [
Record/play]. -
Auto switch card
Same as [Standard], but additionally, the camera switches to the other card when one card becomes full. When the camera switches cards, a new folder is created.
-
Rec. separately
Enables you to set a specific image size for each card (). For each shot, a still photo is recorded to card
 and
and  in your specified image quality.
Note that recording separately to
 and
and  is not available for RAW images.
 -
Rec. to multiple
For each shot, a still photo is recorded to card
and in the same image quality.Consider using an SD card with fast writing speeds for card
, such as a UHS-II card.
Caution
Note
-
Rec. separately/Rec. to multiple
- Images are recorded with the same file number to card and .
- The number of shots available as shown in the viewfinder and on the Quick Control screen is for the card with less free space.
- [Card* full] is displayed when one of the cards becomes full, and shooting is no longer possible. To continue shooting, either replace the card or set [ Rec options] to [Standard] and select the card with free space.
- See Folder Settings for details on [Folder] in [
 : Record func+card/folder sel.].
![]() Rec options
Rec options
Set the recording method for movies.
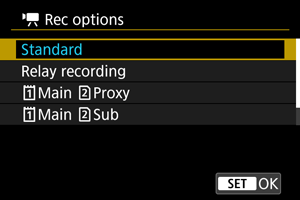
-
Standard
Records movies to the card selected in [
Record/play]. -
Relay recording
The camera switches to the other card and keeps recording when the first card used becomes full.
-
Main Proxy
Main movies are recorded to card
and proxy movies to card with the same file name (but with _Proxy appended to proxy movies). You can set the file name in the [Movies] setting in [: File name]. -
Main Sub
Main movies are recorded to card
and sub movies to card with the same file name. You can set the file name in the [Movies] setting in [: File name]. -
Rec. to multiple
For each recording, the same movie is recorded to card
and .
Caution
- Recording to SD cards may not be possible, depending on the movie recording size. Pressing the movie shooting button will not start recording. For details, see Specifications.
- Noise in [Main Proxy] proxy movies, [Main Sub] sub movies, or HDMI video output may increase when you record main movies in RAW format with the [Gamma/Color Space] gamma for [Custom Picture] set to an option other than [Canon Log 2] or [Canon Log 3]. This does not affect image quality of the recorded RAW movies.
Note
-
Relay recording
- Relay recording that occurs while a single movie is being recorded results in two movie files.
-
Main Proxy
- These items are displayed in movie recording mode.
-
When recording stops for a main movie, recording also stops for the proxy movie.
Main movie recording continues even if proxy movie recording stops.
- Recording is possible even with only one card loaded.
-
The same angle of view and frame rate is used for proxy movies as for main movies.
Recording resolution is as follows.
- For [
 /
/  ] (4096×2160) main movies: [
 ] (2048×1080) proxy movies
 - For [
 /
/  ] (3840×2160) main movies: [
 ] (1920×1080) proxy movies
- For [
- Proxy movie recording is not available at frame rates of 100.0 fps or higher.
- Audio quality can be set for each type of movie in [
 : Audio format].
 -
Main Sub
- These items are displayed in movie recording mode.
- If recording of the main or sub movie stops, recording of the other continues.
- Recording is possible even with only one card loaded.
-
The same angle of view and frame rate is used for sub movies as for main movies.
Recording resolution is as follows.
- Main movies are recorded at [] (6960×3672) resolution and sub movies at [] (4096×2160) resolution.
- Main movies are recorded at [
- Audio format of main movies is restricted to [LPCM/24bit/4CH]. Sub movie audio format can be set in [: Audio format].
-
Rec. to multiple
- Images are recorded with the same file number to card and .
- The available recording time shown in the viewfinder and on the Quick Control screen is for the card with less recording time.
- [Card* full] is displayed when one of the cards becomes full, and shooting is no longer possible. To continue shooting, either replace the card or set [ Rec options] to [Standard] and select the card with free space.
- See Folder Settings for details on [Folder] in [: Record func+card/folder sel.].
Recording/playback selection with two cards inserted
With [![]() Rec options] set to [Standard]/[Auto switch card] or with [
Rec options] set to [Standard]/[Auto switch card] or with [![]() Rec options] set to [Standard]/[Relay recording], select the card for recording and playback.
Rec options] set to [Standard]/[Relay recording], select the card for recording and playback.
With [![]() Rec options] set to [Rec. separately]/[Rec. to multiple] or with [
Rec options] set to [Rec. separately]/[Rec. to multiple] or with [![]() Rec options] set to [
Rec options] set to [![]() Main
Main ![]() Proxy]/[
Proxy]/[![]() Main
Main ![]() Sub]/[Rec. to multiple], select the card for playback.
Sub]/[Rec. to multiple], select the card for playback.
Standard/Auto switch card/Relay recording
-
Select [
Record/play] for still photos or [ Record/play] for movies.: Use card 1 for recording and playback: Use card 2 for recording and playback
Rec. separately/Rec. to multiple/![]() Main
Main ![]() Proxy/
Proxy/![]() Main
Main ![]() Sub
Sub
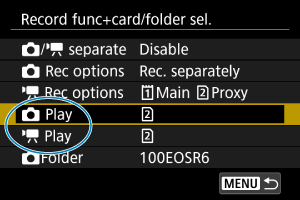
- Select [ Play] for still photos or [ Play] for movies.
- Pressing the button in still photo shooting mode plays images from the card selected in [ Play].
- Pressing the button in movie recording mode plays images from the card selected in [ Play].
Note
- With [Priority: ] set, the camera switches to the priority card when cards are inserted or removed.
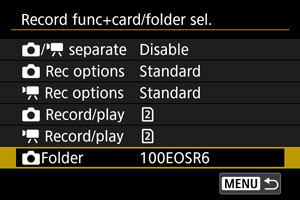
Folder Settings
You can create or select the folder for saving still photos. You can also rename folders.
Note
-
Movie files are saved in the following folder (with **** indicating the reel number).
- XF-HEVC S or XF-AVC S movie files (.MP4): REEL_**** folder in the XFVC folder (up to 999 files)
- RAW movie files (.CRM): REEL_**** folder in the CRM folder (up to 999 files)
- When a new card is loaded, the folder created is named with the reel number set in the [Reel Number] setting for [Movies] in [: File name]. Once the folder has been created, other folders cannot be created, and folders cannot be renamed.
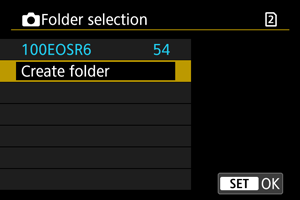
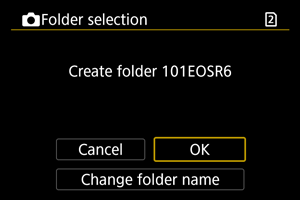
Creating a Folder
Renaming Folders
-
Enter letters and numbers of your choice.
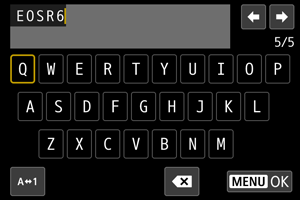
- You can enter five characters.
- By selecting [
 ], you can change the input mode.
 - To delete single characters, select [
 ] or press the
  button.
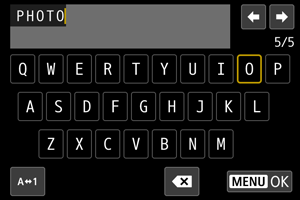
- Use the
 or
or  dial or
  to select a character, then press
  to enter it.
-
Exit the setting.
- Press the
 button, then press [OK].
- Press the
Selecting a Folder
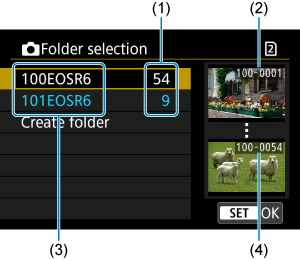
- (1) Number of images in folder
- (2) Lowest file number
- (3) Folder name
- (4) Highest file number
- Select a folder on the folder selection screen.
- Captured images are stored in your selected folder.
Note
-
Folders
- A folder can contain up to 9999 images (file number 0001–9999). When a folder becomes full, a new folder with the folder number increased by one is created automatically. Also, if manual reset () is executed, a new folder will be created automatically. Folders numbered from 100 to 999 can be created.
-
Creating folders with a computer
- With the card open on the screen, create a new folder with “DCIM” as the name. Open the DCIM folder and create as many folders as necessary to save and organize your images. “100ABC_D” is the required format for folder names, and the first three digits must be a folder number in the range 100–999. The last five characters can be any combination of upper- and lower-case letters from A to Z, numerals, and the underscore “_”. The space cannot be used. Also note that two folder names cannot share the same three-digit folder number (for example, “100ABC_D” and “100W_XYZ”) even if the remaining five characters in each name are different.