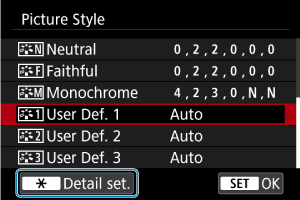
Picture Style
By selecting a preset Picture Style, you can obtain effective image characteristics.
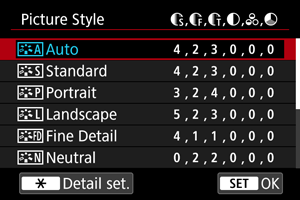
Picture Style Selection
Picture Style Characteristics
-
 Auto
AutoThe color tone will be adjusted automatically to suit the scene. The colors will look vivid for blue skies, greenery and sunsets, particularly in nature, outdoor, and sunset scenes.
Note
- If the desired color tone is not obtained with [Auto], use another Picture Style.
-
 Standard
The image looks vivid, sharp, and crisp. Suitable for most scenes.
-
 Portrait
For smooth skin tones, with slightly less sharpness. Suited for close-up portraits.
Skin tone can be adjusted by changing [Color tone] as described in Settings and Effects.
-
 Landscape
For vivid blues and greens, and very sharp and crisp images. Effective for impressive landscapes.
-
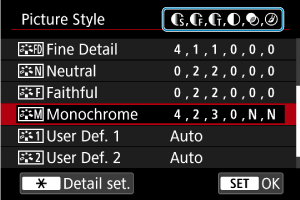
 Fine Detail
For detailed rendering of fine subject contours and subtle textures. The colors will be slightly vivid.
-
 Neutral
For retouching later on a computer. Makes images subdued, with lower contrast and natural color tones.
-
 Faithful
For retouching later on a computer. Faithfully reproduces the actual colors of subjects as measured in daylight with a color temperature of 5200K. Makes images subdued, with lower contrast.
-
 Monochrome
Creates black-and-white images.
Caution
- Color images cannot be recovered from JPEG/HEIF images shot with the [Monochrome] Picture Style.
-
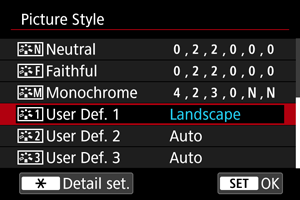
 User Def. 1–3
You can add a new style based on presets such as [Portrait] or [Landscape] or a Picture Style file, then adjust it as needed (). Shots taken with a style you have not customized yet will have the same characteristics as the default [Auto] setting.
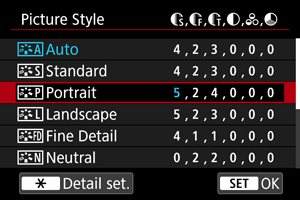
Symbols
Icons on the Picture Style selection screen represent [Strength], [Fineness], and [Threshold] for [Sharpness] as well as [Contrast] and other parameters. The numbers indicate the values for these settings specified for the respective Picture Style.

| Sharpness | ||
| Strength | ||
| Fineness | ||
| Threshold | ||
| Contrast | ||
| Saturation | ||
| Color tone | ||
| Filter effect (Monochrome) | ||
| Toning effect (Monochrome) | ||
Caution
- For movie recording, “*, *” is indicated for the [Fineness] and [Threshold] parameters of [Sharpness]. [Fineness] and [Threshold] cannot be set for movie recording.
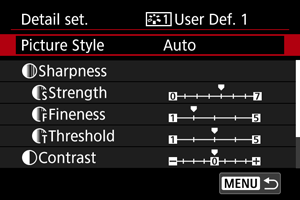
Picture Style Customization
You can customize any Picture Style by changing it from the default settings. For details on customizing [Monochrome], see ![]() Monochrome Adjustment.
Monochrome Adjustment.
-
Select a Picture Style.
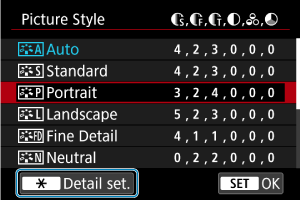
- Select the Picture Style to adjust, then press the
 button.
- Select the Picture Style to adjust, then press the
-
Select an option.
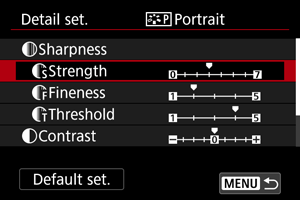
- Select an option, then press
 .
. - For details on settings and effects, see Settings and Effects.
- Select an option, then press
-
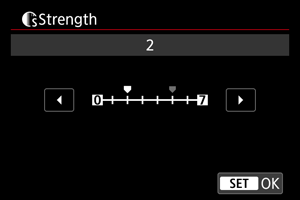
Set the effect level.
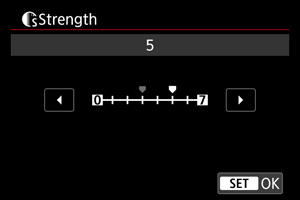
- Adjust the effect level, then press .
- Press the
 button to save the adjusted setting and return to the Picture Style selection screen.
 - Any settings you change from default values are displayed in blue.
- Adjust the effect level, then press
Note
- For movie recording, [Fineness] and [Threshold] for [Sharpness] cannot be set (not displayed).
- By selecting [Default set.] in step 3, you can restore the parameter settings of the respective Picture Style to the defaults.
- To shoot with the Picture Style you adjusted, first select the adjusted Picture Style, then shoot.
Settings and Effects
| Sharpness | ||||
| Strength | 0: Weak outline emphasis | 7: Strong outline emphasis | ||
| Fineness*1 | 1: Fine | 5: Grainy | ||
| Threshold*2 | 1: Low | 5: High | ||
| Contrast | –4: Low contrast | +4: High contrast | ||
| Saturation | –4: Low saturation | +4: High saturation | ||
| Color tone | –4: Reddish skin tone | +4: Yellowish skin tone | ||
1: Indicates the edge thinness that enhancement applies to. The smaller the number, the finer the outlines that can be emphasized.
2: Contrast threshold between edges and surrounding image areas, which determines edge enhancement. The smaller the number, the more the outline will be emphasized when the contrast difference is low. However, noise tends to be more noticeable when the number is smaller.
Monochrome Adjustment
 Filter effect
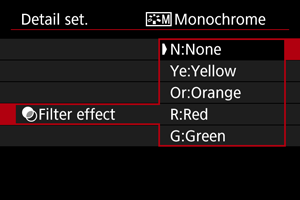
With a filter effect applied to a monochrome image, you can make white clouds or green trees stand out more.
| Filter | Sample Effects |
|---|---|
| N:None | Normal black-and-white image with no filter effects. |
| Ye:Yellow | Blue sky will look more natural, and white clouds will look crisper. |
| Or:Orange | The blue sky will look slightly darker. The sunset will look more brilliant. |
| R:Red | The blue sky will look quite dark. Fall leaves will look crisper and brighter. |
| G:Green | Skin tones and lips will appear muted. Green tree leaves will look crisper and brighter. |
Note
- Increasing [Contrast] will make the filter effect more pronounced.
 Toning effect
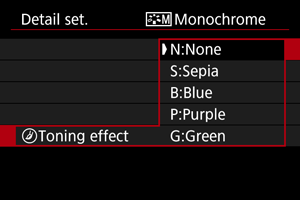
By applying a toning effect, you can create a monochrome image in the selected color. Effective when you want to create memorable images.
Picture Style Registration
You can select a base Picture Style such as [Portrait] or [Landscape], adjust it as desired, and register it under [User Def. 1] – [User Def. 3]. Useful when creating several Picture Styles with different settings.
-
Select [User Defined].
- Select [User Def. *], then press the button.
- Select [User Def. *], then press the
-
Press
.
- With [Picture Style] selected, press .
- With [Picture Style] selected, press
-
Select a base Picture Style.
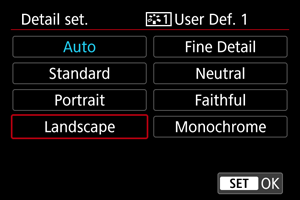
- Select the base Picture Style, then press .
- Select the base Picture Style, then press
-
Select an option.
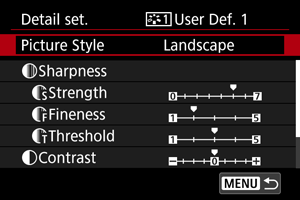
- Select an option, then press .
- Select an option, then press
-
Set the effect level.
- Adjust the effect level, then press .
- For details, see Picture Style Customization.
- Press the button to save the adjusted setting and return to the Picture Style selection screen.
- The base Picture Style will be indicated on the right of [User Def. *].
- Blue style names in [User Def. *] have been changed from default values.
- Adjust the effect level, then press
Caution
- If a Picture Style is already registered under [User Def. *], changing the base Picture Style will clear the parameter settings of the previously registered User Defined Picture Style.
- You can restore the default [User Def. *] style and settings by selecting [Basic settings] in [
 : Reset camera].
Note
- To shoot with a registered Picture Style, select the registered [User Def. *], then shoot.