Part Names

- (1) Power button
- (2) Mode dial
- (3) Movie shooting button
- (4) Zoom lever
During shooting: W Wide-angle/T Telephoto
During playback:
 Index/
 Magnify
 - (5) Shutter button
- (6) Tally lamp
- (7) AF-assist beam/red-eye reduction/self-timer/remote control lamp
- (8) Grip
- (9) Lens
- (10) Microphone (stereo)
- (11) Multi-function shoe
- (12)
 Focal plane mark
 - (13) Strap mount
- (14) Exhaust vent
- (15) Intake vent
- (16) Speaker
- (17)
 Control ring
 - (18) Screen
- (19) Card/battery compartment cover
- (20) Card/battery compartment cover lock
- (21) Tripod socket
- (22) Shoe cover

- (1) Exhaust vent
- (2) Still photo shooting/movie recording switch
- (3) Strap mount
- (4) Terminal cover
- (5) Serial number (body number)
- (6)
 AE lock button
 - (7)
 /
/ /
/ Up/exposure compensation/erase button
 - (8)
 /
/
 Left/autofocus/manual focus button
 - (9)
 /
/ Control dial/cross keys
 - (10) Access lamp
- (11)
 Playback button
 - (12)
 Multi-function button
 - (13)
 Quick Control/Set button
 - (14)
 /
/ /
/ Right/self-timer/drive mode selection button
 - (15)
 /
/ Down/Info button
 - (16)
 Menu button
 - (17)
 External microphone IN terminal
 - (18)
 HDMI micro terminal
 - (19)
 Headphone terminal
 - (20)
 Digital terminal
Still photo shooting/movie recording switch

For still photo shooting, set the still photo shooting/movie recording switch to <![]() > and for movie recording, set it to <
> and for movie recording, set it to <![]() >.
>.
Caution
- When the still photo shooting/movie recording switch has been flipped, check the camera settings once again before shooting.
Note
- You can record movies by pressing the movie shooting button during still photo shooting.
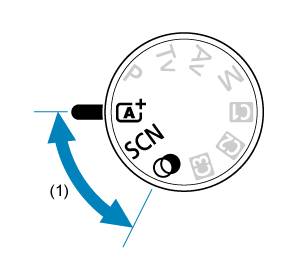
Mode dial
The Mode dial is divided into Basic Zone and Creative Zone modes.
(1) Basic Zone
The camera sets everything to suit the subject or scene for shooting ().
(2) Creative Zone
You can set the shutter speed or aperture value and change the camera settings to shoot ().
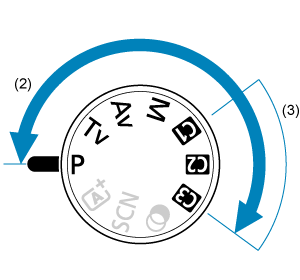
(3) Custom shooting modes
You can assign P, Tv, Av, M, AF operation, menu functions, and more to ![]() ,
, ![]() , or
, or ![]() ().
().
Attaching the Strap
-
Attach the included wrist strap to the strap mount.
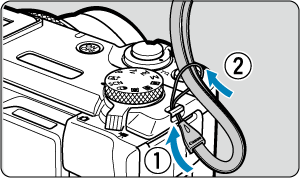
- The wrist strap can also be attached on the left side.
Attaching a Windscreen
-
Turn the camera off.
-
Remove the shoe cover from the camera's multi-function shoe.
-
Attach the windscreen to the camera's multi-function shoe.
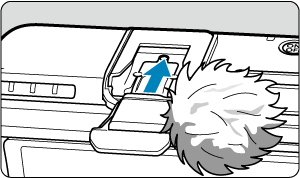
Caution
- When attaching the windscreen, make sure that the fur does not get caught in the hot shoe.
Note
- If the windscreen fur falls off, attach it as follows.
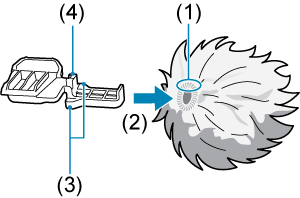
Orient the windscreen as shown so that the white thread (1) is on top.
Insert the attachment into the fur with the orientation shown in (2).
Cover the protrusions (3) with the fur so that they fit inside.
Leave the protrusion (4) outside of the fur.