Time-Lapse Movies
Still photos shot at a set interval can be stitched together automatically to create a 4K or Full HD time-lapse movie. A time-lapse movie shows how a subject changes in a much shorter period of time than the actual time it took. It is effective for a fixed-point observation of changing scenery, growing plants, celestial motion, etc.
Time-lapse movies are recorded in MP4 format at the following quality: ![]()
![]()
![]() (NTSC)/
(NTSC)/![]()
![]()
![]() (PAL) in 4K recording, and
(PAL) in 4K recording, and ![]()
![]()
![]() (NTSC)/
(NTSC)/![]()
![]()
![]() (PAL) in Full HD recording.
(PAL) in Full HD recording.
Note that the frame rate is updated automatically to match the [![]() : Video system] setting ().
: Video system] setting ().
-
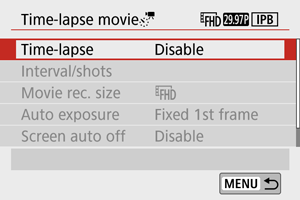
Select [
 : Time-lapse movie].
-
Select [Time-lapse].
-
Select a scene.
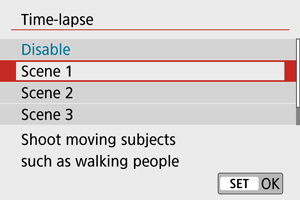
- Select a scene to suit the shooting situation.
- For greater freedom when setting the shooting interval and number of shots manually, select [Custom].
-
Set the shooting interval.
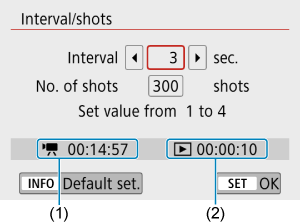
- Select [Interval/shots].
- Select [Interval] (sec.). Use the

 keys to set a value, then press
  .
. - Refer to [
 : Time required] (1) and [
 : Playback time] (2) as you set it.
When [Custom] is set
- Select [Interval] (min.:sec.).
- Press to display
 .
. - Use the

 keys to set a value, then press . (Returns to
  .)
.) - Select [OK] to register the setting.
-
Set the number of shots.
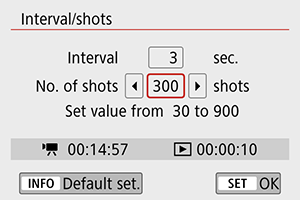
- Select [No. of shots]. Use the keys to set a value, then press .
- Refer to [: Time required] and [: Playback time] as you set the number.
When [Custom] is set
- Select the digit.
- Press to display .
- Use the keys to set a value, then press . (Returns to .)
- Make sure [: Playback time] is not displayed in red.
- Select [OK] to register the setting.
Caution
- [Playback time] is displayed in red if the card does not have enough free space for your specified number of shots. Although the camera can continue recording, the recording will stop when the card becomes full.
- [Playback time] is displayed in red if the [No. of shots] setting results in a file size exceeding 4 GB for a card not formatted in exFAT (). If you keep recording in this condition and the movie file size reaches 4 GB, the time-lapse movie recording will stop.
Note
- With [Scene *], available intervals and numbers of shots are restricted, to suit the type of scene.
- For details on cards that can record time-lapse movies, see Card performance requirements (Movie recording).
- If the number of shots is set to 3600, the time-lapse movie will be approx. 2 min. in NTSC and approx. 2 min. 24 sec. in PAL.
- Select [No. of shots]. Use the
-
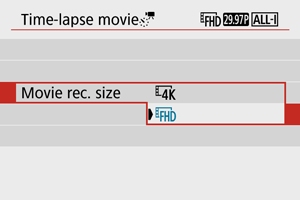
Select the desired movie recording size.
-
 (3840 × 2160)
The movie is recorded in 4K quality. The aspect ratio is 16:9.
The frame rate is 29.97 fps (
 ) for NTSC and 25.00 fps (
 ) for PAL, and movies are recorded in MP4 (
 ) format with ALL-I (
 ) compression.
 -
 (1920 × 1080)
The movie will be recorded in Full High-Definition (Full HD) quality. The aspect ratio is 16:9.
The frame rate is 29.97 fps (
) for NTSC and 25.00 fps () for PAL, and movies are recorded in MP4 () format with ALL-I () compression.
-
-
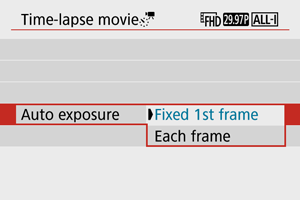
Set [Auto exposure].
-
Fixed 1st frame
When taking the first shot, metering is performed to set the exposure automatically to match the brightness. The exposure setting for the first shot will be applied to subsequent shots. Other shooting-related settings for the first shot will also be applied for subsequent shots.
-
Each frame
Metering is also performed for each subsequent shot to set the exposure automatically to match the brightness. Note that any functions such as Picture Style and white balance that are set to [Auto] will be set automatically for each subsequent shot.
Caution
- Significant changes in brightness between shots may prevent the camera from shooting at the specified interval when [Interval] is set to 3 sec. or less and [Auto exposure] is set to [Each frame].
- With [Auto exposure] set to [Each frame], the ISO speed, shutter speed, and aperture value may not be recorded in the time-lapse movie Exif information in some shooting modes.
-
-
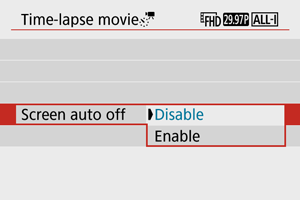
Set [Screen auto off].
-
Disable
Even during time-lapse movie recording, the image will be displayed. (The screen turns off only at the time of shooting.) Note that the screen will turn off when approx. 30 min. elapse after the shooting started.
-
Enable
Note that the screen will turn off when approx. 10 sec. elapse after the shooting started.
Note
- During time-lapse movie recording, you can press the
 button to turn on/off the screen.
-
-
Set the beeper.
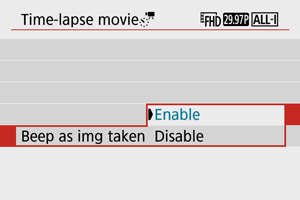
- Select [Beep as img taken].
- Set to [Disable] to prevent the camera from beeping for each shot.
-
Check the settings.
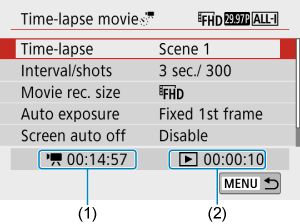
(1) Time required
Indicates the time required to shoot the set number of shots with the set interval. If it exceeds 24 hours, “*** days” will be displayed.
(2) Playback time
Indicates the movie recording time (time required to play back the movie) when creating the time-lapse movie in 4K movie or Full HD movie from the still photos taken with the set intervals.
-
Close the menu.
- Press the
 button to turn off the menu screen.
- Press the
-
Record the time-lapse movie.
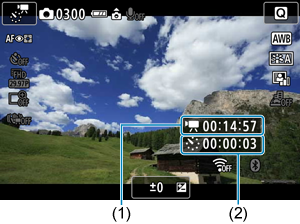
- Press the button and check again the “Time required (1)” and “Interval (2)” displayed on the screen.
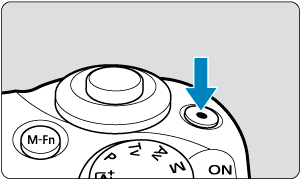
- Press the movie shooting button to start time-lapse movie recording.
- AF will not work during time-lapse movie recording.
- “
 REC” is displayed in the upper right of the screen as the time-lapse movie is recorded.
 - When the set number of shots are taken, the time-lapse movie recording ends.
- To cancel recording time-lapse movies, set [Time-lapse] to [Disable].
- Press the
Caution
- Do not point the camera toward an intense light source, such as the sun or an intense artificial light source. Doing so may damage the image sensor or the camera’s internal components.
- [: Time-lapse movie] cannot be set to an option other than [Disable] when the camera is connected to a computer with the interface cable, or when an HDMI cable is connected.
- Movie Servo AF will not function.
- If the shutter speed is 1/30 sec. or slower, the exposure of the movie may not be displayed properly (may differ from that of the resulting movie).
- Do not zoom the lens during time-lapse movie recording. Zooming the lens may cause the image to be out of focus, the exposure to change, or the lens aberration correction not to function properly.
- Recording time-lapse movies under flickering light may cause noticeable screen flickering, and images may be captured with horizontal stripes (noise) or irregular exposure.
- Images displayed as time-lapse movies are recorded may look different from the resulting movie (in details such as inconsistent brightness from flickering light sources, or noise from a high ISO speed).
- When recording a time-lapse movie under low light, the image displayed during shooting may look different from what is actually recorded in the movie. In such cases, the [
 ] icon will blink.
 - If you move the camera from left to right (panning) or shoot a moving subject during time-lapse movie recording, the image may look extremely distorted.
- During time-lapse movie recording, auto power off will not take effect. Also, you cannot adjust the shooting function and menu function settings, play back images, etc.
- Sound is not recorded for time-lapse movies.
- If the shutter speed exceeds the shooting interval (such as for long exposures), or if a slow shutter speed is set automatically, the camera may not be able to shoot at the set interval. Shooting may also be prevented by shooting intervals nearly the same as the shutter speed.
- If the next scheduled shot is not possible, it will be skipped. This may shorten the recording time of the created time-lapse movie.
- If the time it takes to record to the card exceeds the shooting interval due to the shooting functions set or card performance, some of the shots may not be taken with the set intervals.
- The captured images are not recorded as still photos. Even if you cancel the time-lapse movie recording after only one shot is taken, it will be recorded as a movie file.
- Set [: Time-lapse movie] to [Disable] if you will connect the camera to a computer with the interface cable and use EOS Utility (EOS software). Options other than [Disable] will prevent the camera from communicating with the computer.
- During time-lapse movie recording, the lens’s Image Stabilizer will not operate.
- Time-lapse movie recording ends if the power switch is set to
 , and the setting changes to [Disable].
 - Even if a flash is used, it will not fire.
-
The following operations cancel standby for time-lapse movie recording and switch the setting to [Disable].
- Selecting either [Clean now
 ] in [
 : Sensor cleaning] or [Basic settings] in [: Reset camera]
 - Using the Mode dial
- Selecting either [Clean now
- If you start time-lapse movie recording while the white [
 ] () icon is displayed, the image quality of the time-lapse movie may deteriorate. It is recommended that you start time-lapse movie recording after the white [] icon disappears (camera’s internal temperature decreases).
Note
- Using a tripod is recommended.
- Taking test shots in advance is recommended.
- The movie’s field of view coverage for both the 4K and Full HD time-lapse movie recording is approx. 100%.
- To cancel time-lapse movie recording in progress, press the movie shooting button. The time-lapse movie shot so far will be recorded on the card.
- If the time required for recording is more than 24 hours but not more than 48 hours, “2 days” will be indicated. If three or more days are required, the number of days will be indicated in 24-hour increments.
- Even if the time-lapse movie’s playback time is less than 1 sec., a movie file will still be created. In this case, “00'00"” is indicated in [Playback time].
- If the recording time is long, using the household power outlet accessories (sold separately) is recommended.
- YCbCr 4:2:0 (8-bit) color sampling and the BT.709 color space are used for 4K/Full HD time-lapse movies.
Note
- You can use Wireless Remote Control BR-E1 (sold separately) to start and stop the time-lapse movie recording. Prepare by setting [: Remote control] to [Enable].
-
With Wireless Remote Control BR-E1
Camera Status/
Remote Control Setting
(Immediate Release)2 (2-sec. Delay)
(Movie Recording)Recording standby As set in the Shutter Button Function for Movies setting Starts recording During time-lapse movie recording Ends recording
Approx. Time Available for Recording Time-Lapse Movies
For guidelines on how long you can record time-lapse movies (until the battery runs out), see Available Operating Time.