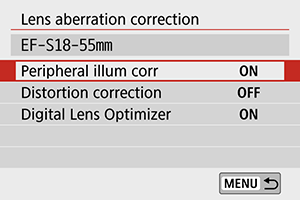
Lens Aberration Correction
- Peripheral Illumination Correction
- Distortion Correction
- Digital Lens Optimizer
- Chromatic Aberration Correction
- Diffraction Correction
Vignetting, image distortion, and other issues may be caused by lens optical characteristics. The camera can compensate for these phenomena by using [Lens aberration correction].
-
Select [
 : Lens aberration correction].
-
Select an item.
-
Select [Enable].
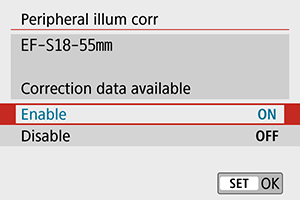
- Confirm that the name of the attached lens and [Correction data available] are displayed (except when [Diffraction correction] is set).
- If [Correction data not available] or [
 ] is displayed, see Digital Lens Optimizer.
Peripheral Illumination Correction
Vignetting (dark image corners) can be corrected.
Caution
- Depending on shooting conditions, noise may appear on the image periphery.
- The higher the ISO speed, the lower the correction amount will be.
Note
- The correction amount applied will be lower than the maximum correction amount that applied with Digital Photo Professional (EOS software).
- Peripheral illumination is corrected automatically in Basic Zone modes when correction data is registered on the camera.
Distortion Correction
Distortion (image warping) can be corrected.
Caution
- To correct distortion, the camera captures a narrower image area than the area seen when shooting, which crops the image a little and slightly lowers the apparent resolution.
- Setting distortion correction may change the angle of view slightly.
- When you magnify images, distortion correction is not applied to the images displayed.
- Distortion correction is not applied in movie recording.
- Images with distortion correction applied will not have the Dust Delete Data () appended. Also, the AF point may be displayed out of position, relative to the time of shooting.
Note
- Distortion is corrected automatically when
 mode is set to
  mode with correction data registered on the camera.
Digital Lens Optimizer
Various aberrations from lens optical characteristics can be corrected, along with diffraction and low-pass filter-induced loss of resolution.
If [Correction data not available] or [![]() ] is displayed by [Digital Lens Optimizer], you can use EOS Utility to add the lens correction data to the camera. For details, refer to the EOS Utility Instruction Manual.
] is displayed by [Digital Lens Optimizer], you can use EOS Utility to add the lens correction data to the camera. For details, refer to the EOS Utility Instruction Manual.
Caution
- Depending on shooting conditions, noise may be intensified together with the effects of correction. Image edges may also be emphasized. Adjust Picture Style sharpness or set [Digital Lens Optimizer] to [Disable] as needed before shooting.
- The higher the ISO speed, the lower the correction amount will be.
- For movie recording, [Digital Lens Optimizer] will not appear. (Correction is not possible.)
Note
- Enabling [Digital Lens Optimizer] will correct both chromatic aberration and diffraction when you shoot, although these options are not displayed.
- Digital Lens Optimizer is applied automatically in Basic Zone modes with correction data registered on the camera.
Chromatic Aberration Correction
Chromatic aberration (color fringing around subjects) can be corrected.
Note
- [Chromatic aberr corr] is not displayed when [Digital Lens Optimizer] is enabled.
Diffraction Correction
Diffraction (loss of sharpness caused by the aperture) can be corrected.
Caution
- Depending on shooting conditions, noise may be intensified together with the effects of correction.
- The higher the ISO speed, the lower the correction amount will be.
- For movie recording, [Diffraction correction] will not appear. (Correction is not possible.)
Note
- “Diffraction correction” corrects diffraction as well as degraded resolution from the low-pass filter and other factors. Therefore, correction is effective even at an aperture close to the open aperture.
- [Diffraction correction] is not displayed when [Digital Lens Optimizer] is set to [Enable].
Caution
-
General precautions for lens aberration correction
- Peripheral illumination correction, chromatic aberration correction, distortion correction, and diffraction correction cannot be applied to JPEG images already taken.
- When using a non-Canon lens, setting the corrections to [Disable] is recommended even if [Correction data available] is displayed.
- Magnifying the periphery of the image may display parts of the image that will not be recorded.
- The correction amount will be less (except for diffraction correction) if the lens used does not have distance information.
Note
-
General notes for lens aberration correction
- The effect of the lens aberration correction varies depending on the lens used and shooting conditions. Also, the effect may be difficult to discern depending on the lens used, shooting conditions, etc.
- If the correction is difficult to discern, magnifying and checking the image after shooting is recommended.
- Corrections can be applied even when an extender or life-size converter is attached.
- If the correction data for the attached lens is not registered to the camera, the result will be the same as when the correction is set to [Disable] (except for diffraction correction).
- If necessary, refer to the EOS Utility Instruction Manual as well.