Using as a Webcam
This section describes how to use the camera as a webcam by connecting the camera with a computer via a wireless LAN access point.
Checking Access Point Settings
The Wi-Fi base unit (such as a Wi-Fi router) to be used an access point should be compliant with the Wi-Fi standards () shown in the specifications.
-
Network name (SSID/ ESSID)
The available access points are SSID or ESSID. These are also referred to as the “Access Point Name” or “Network Name”.
-
Network authentication/data encryption (encryption scheme/encryption mode)
This scheme encrypts data during wireless communication. Check whether “WPA2-PSK (AES)”, “WPA2-PSK (TKIP)”, or “None” exist.
-
Passwords (encryption key/network key)
These keys are used to encrypt data during wireless communication. These are also referred to as “encryption keys” or “network keys”.
Caution
- When specifying settings in a network with a system administrator, ask the network administrator for network settings.
- This information is extremely critical for security. Take care when handling such information.
Note
- Routers are devices used to construct networks (LAN) by connecting multiple computers, etc. Also, routers with built-in Wi-Fi functions are known as “Wi-Fi routers”.
- In this manual, all Wi-Fi base units such as Wi-Fi routers are referred to as “access points”.
- If filtering MAC addresses with the access point you will join, add the camera's MAC address to the access point. You can check the camera's MAC address by referring to [MAC address] under [Network Settings] ().
Specifying Webcam Settings
-
Click the link below to install the Wireless Webcam Utility for Mini PTZ Cam software for connecting with computers.

-
Open the Settings screen on Connect App for Mini PTZ Cam.
-
Tap [Webcam settings].

-
Set the wireless LAN access point.
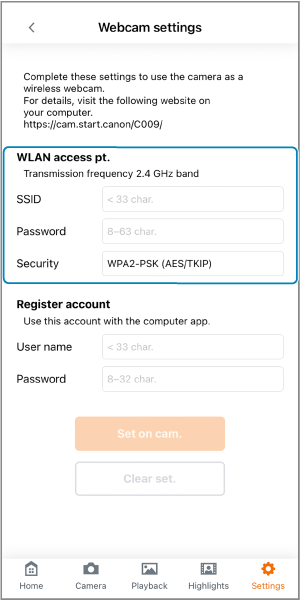
- Enter the SSID and the password of the wireless LAN access point on the same network as the connected computer.
- For “Security”, select the type used by the wireless LAN access point.
-
Register your webcam account.

- Register the desired username and password for the camera. Make a note of the username and password as they will be used for establishing connections with computers.
-
Press [Set on cam.].
- Register the wireless LAN access point and webcam account to the camera.
- If you forget the username or password for your webcam account, press [Clear set.] to delete all settings and perform step 4 again.
-
Press the
 button on the camera once.
- If connecting the camera and Connect app for Mini PTZ Cam via SSID, press the button twice.
- If connecting the camera and Connect app for Mini PTZ Cam via SSID, press the
-
Click the app icon in the notification area on the right side of the computer taskbar.

-
Select which camera to use as the webcam.

- Camera nicknames are shown.
-
Enter the username and password set in step 5 and press the Connect button.
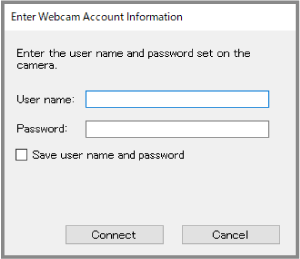
- The camera will be now available for use as a webcam.
- Specify this camera for use with web conferencing apps.
Note
- To stop using the webcam and reconnect the camera to the Connect app for Mini PTZ Cam, restart the camera.
- To use the camera as a webcam again after the camera power has been turned off, turn on the camera again and perform the operation from step 7.